
There are many encryption and decryption tools around. PowerShell is a Windows built-in tool and you can use it for cryptography as well. In this blog post I am going to play with encryption and decryption of data. My followers know what’s coming next: I don’t care much of 3rd party tools and yes, of course, I am going to use only Windows PowerShell. ![]()
Introduction
First of all we need a certificate. This certificate will include a private key and public key. With the private key we can decrypt data. With the public key we can encrypt data. This means if someone has my public key (I can give it to someone without any worries) he can encrypt data which is addressed to me. And I am the only one on this planet who can decrypt it. Because I am the only one who has the private key.

Creating a Certificate with New-SelfSignedCertificate
First I create a code-signing certificate with PowerShell. Name it whatever you want.
New-SelfSignedCertificate -DnsName pewa2303 -CertStoreLocation "Cert:\CurrentUser\My" -KeyUsage KeyEncipherment,DataEncipherment, KeyAgreement -Type DocumentEncryptionCert

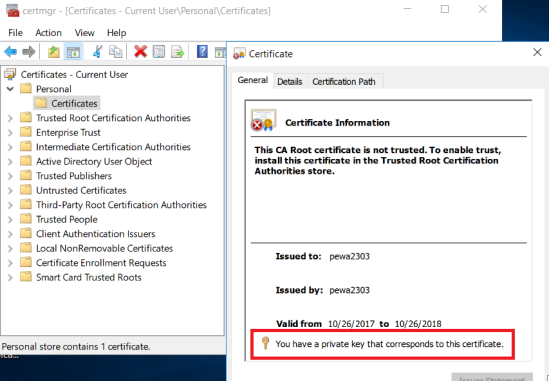
To view the certificate run certmgr.msc.
certmgr.msc

Oh, what a shame. 😳 I’ve promised I will use only PowerShell. Ok, ok here’s the command for showing your cert in PowerShell:
Get-Childitem -Path Cert:\CurrentUser\My -DocumentEncryptionCert

Memorize the Subject Name of your certificate. We’ll need it in the next step.
Encrypting Data
The Protect-CmsMessage cmdlet encrypts content. Make sure, you’re running PowerShell 5.0 or above.
(Get-Host).Version.Major

Pay attention to the To Parameter. You have to provide your certificate name there. The name of my certificate is cn=pewa2303. The encrypted data will be stored in a file.
"This is a secret message" | Protect-CmsMessage -To cn=pewa2303 -OutFile C:\Temp\secret.txt
Once completed, open the file with Notepad to see what happened. Nice code 😉

Decryption of Data
To decrypt the encrypted data run Unprotect-CmsMessage. Make sure you are logged in with the user account that created the certificate and has the private key.
Unprotect-CmsMessage -Path C:\Temp\secret.txt

Nice one.
What happens when another user trys to open the file? Petra is not able to decrypt the data. She does not have the private key.

Unprotect-CmsMessage : The enveloped-data message does not contain the
specified recipient.
See also
See also my other security-related PowerShell articles …
How to digitally sign PowerShell Scripts
Monitoring Windows PowerShell: Enable Module Logging
Windows Server 2016: Configuring Time based Group Membership with PowerShell
Categories: Cyber Security, PowerShell, Windows 10, Windows Server


For biggest data you needed use synchronous key
async key for generated and crypt sync key
LikeLike
Great tutorial.
I love it when everything can be done with just PowerShell.
However, I have one question.
I imported the public key from server01 to client01. I encrypted the data on client01 and was able to decrypt the file on server01 because only server01 had the private key. (Yes I know it is user specific, but the user on the server was different to the user on the client).
Now my question, does anyone know why the public key needs to be stored in the “personal” store?
I tried “trusted people” but could not encrypt the data on the client with error “Protect-CmsMessage : Cannot load encryption certificate. The certificate setting ‘CN=Server User’ does not represent a valid base-64 encoded certificate, nor does it represent a valid certificate by file, directory, thumbprint, or subject name.”
Yes, I imported the exact same file to the “personal” and “Trusted People” store!
Both were exported as Base-64.
Thanks in advance for any help.
LikeLike
So how do you export public key to give to someone who can encrypt with your public key?
The method you’ve shown seems to encrypt & decrypt with certificate stored in certificate store.
Thanks.
LikeLike
What’s about biggest file 2+gb? 🙂
LikeLike