
We have already learned a lot about PowerShell. Last time we worked with WMI: PowerShell for Beginners (Part 9): Get it all from Windows with PowerShell and WMI Now, in my opinion, it is the best time to focus on the topic “Filtering with PowerShell”. But first, let’s look at the exercise from the last part.
All parts of the series can be found here: PowerShell for Beginners (Series)
Review (Part 9)
Here is the assignment and the solution from part 9:
Retrieve information about your hard disk. Use Get-WmiObject or Get-CimInstance. First, search for the WMI Object and once you’ve found it show the Name, the Partitions, the Model, the Firmware and the Serial Number.
First, we need to find out the WMI instance name. Since the task refers to the hard disk, we could search for *disk*, for example.
Get-WmiObject *disk* -List

Win32_DiskDrive sounds good. Remember the two step method from part 8 for getting more out of PowerShell:
Get-CimInstance win32_diskdrive | Get-Member
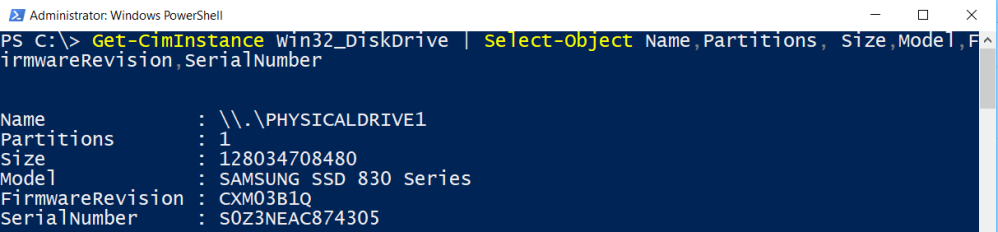
There you’ll find the appropriate attributes. Now use Select-Object to get them all.
Get-CimInstance Win32_DiskDrive | Select-Object Name,Partitions, Size,Model,FirmwareRevision,SerialNumber
Review
WMI (Windows Management Instruments) provides read and write access to almost all Windows settings. There are two important cmdlets: Get-WmiObject and Get-CimInstance.
Why filtering?
Filtering is a key technology in PowerShell. Once you know how to filter, you’ll get more out of PowerShell.
Well, my task for this part is to explain why filtering is important. Ok let’s say you have more than one harddisk. The output above shows you all hard disks. But you want to display only Samsung hard disks, for example.

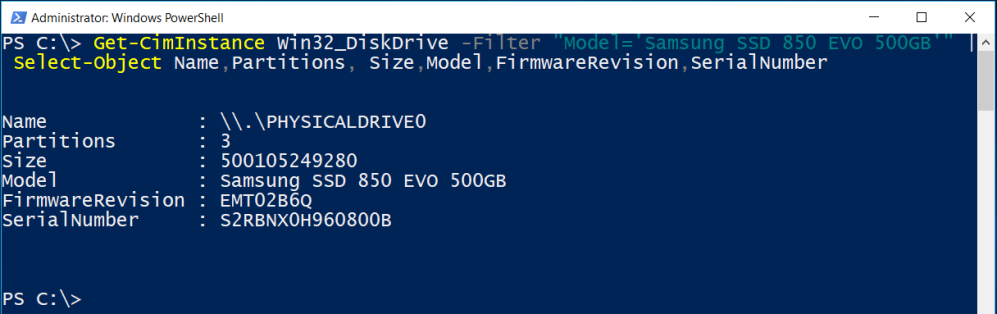
Why would you want to do this? Maybe your boss asks you how many Samsung disks are in use. On ALL computers. Remember, WMI and PowerShell enables you to do remote queries. Ok back to topic. We want only the Samsung SSD with 500 GB. Watch the filter parameter!
Get-CimInstance Win32_DiskDrive -Filter "Model='Samsung SSD 850 EVO 500GB'" | Select-Object Name,Partitions, Size,Model,FirmwareRevision,SerialNumber
The following is a little out of the ordinary and for more advanced PowerShell nerds, but why not? The following command gets all Samsung SSDs from all domain computers, but not from servers.
Get-CimInstance Win32_DiskDrive -Filter "Model='Samsung SSD 850 EVO 500GB'" -ComputerName (Get-ADComputer -Filter {operatingsystem -notlike '*server*'}).Name | Select-Object Name,Partitions, Size,Model,FirmwareRevision,SerialNumber
If your colleagues think you’re facing an unsolvable problem, just hit the buttons and show them what you can do. 😉
Ok, let’s go to the examples for beginners.
Filtering Objects
Do you remember the Get-ChildItem command? I’ve used this command very often in this series.
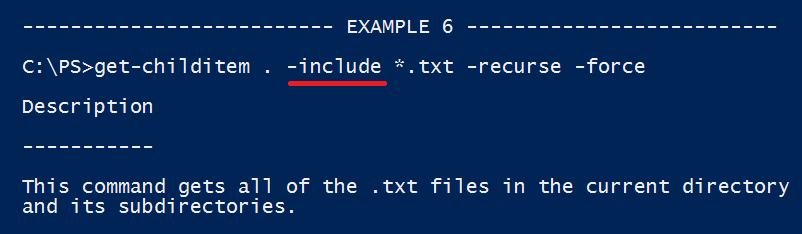
If you run Get-Help Get-ChildItem you’ll find a lot of filtering examples in the help.
Get-Help Get-ChildItem -Online
I prefer using the local help.
Get-Help Get-ChildItem -Examples
What have we learned so far?
Filtering is a key technology in PowerShell. Once you understand how to filter, you’ll get more out of PowerShell.
Filtering Active Directory Objects
If you are an IT-Pro, you probably work in an Active Directory environment. Filtering is a key technique when working with Active Directory Objects.
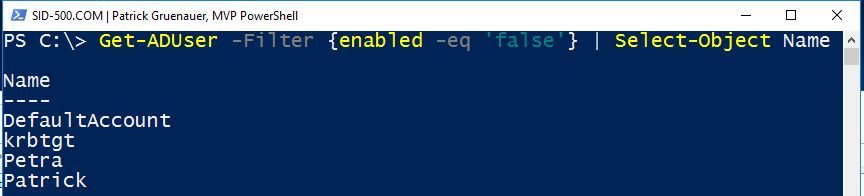
The following command uses the Filter parameter to get all users that are disabled:
Get-ADUser -Filter {enabled -eq 'false'} | Select-Object Name
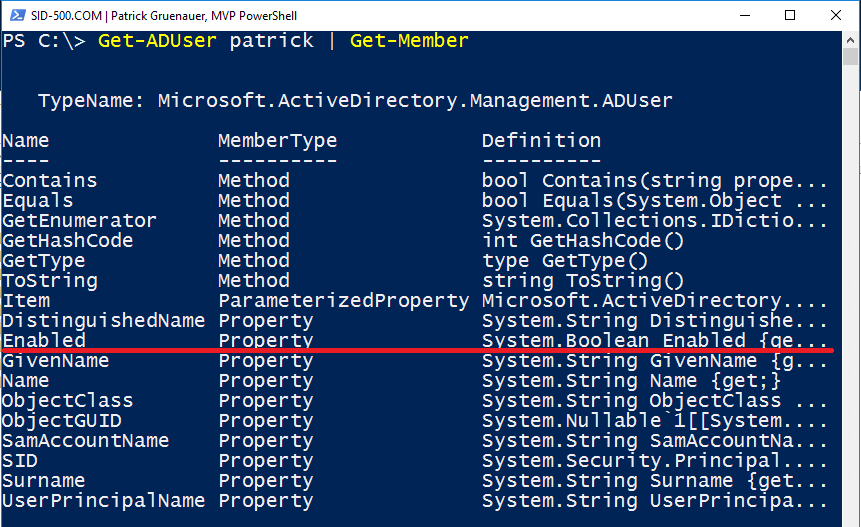
You might be wondering how I know the attribute names? Remember the 2-step method to get more out of objects: 1. use Get-Member 2. use Select-Object.
The Filter Parameter
Let’s take a look around. Which commands use the filter parameter? Note that I am on a domain controller.
Get-Command -ParameterName Filter
As you can see the filter parameter is mostly used in Active Directory commands. And I have to admit that I have always used the filter parameter only for Active Directory. That’s the way it is. So, let’s concentrate on Active Directory. Say we want all Domain Computers (Server operating system and Client operating system) sorted by operating system. For this we have to use the filter parameter with *.
Get-ADComputer -Filter * -Properties Name,Operatingsystem,OperatingSystemVersion,IPv4Address | Sort-Object OperatingSystem | Select-Object Name,OperatingSystem

In terms of filtering, this was a simple task.
The Filtering Method
Now we try to get all the computers that have Windows 10 installed. For this, we have to put the filter parameter in curved brackets.
Get-ADComputer -Filter {operatingsystem -like '*windows 10*'}
It’s time to break down the details.
The brackets
Put the filter into curved brackets.

The attributes
Next find out the properties (attributes) name. We’ve already discussed it in PowerShell for Beginners (Part 8): The Power of PowerShell – Getting in Touch with Objects (Get-Member, Select-Object). Remember the two step method!

Get-ADComputer client01 -Properties * | Get-Member

Side Note: Note the properties parameter. In Active Directory not all properties are displayed by default.
The operators
Next use an operator.

An operator could be -like, -as, -equal, -ne and so on … For more about parameters type
help about_operators
This opens a text file that is stored on your computer.
The statement
If we want to filter something, we need a condition. This condition has to be placed in quotation marks.

Review
If you are working with filters, see the Help section first. Filters are usually placed in parentheses. Often an operator is also used.
Some more Filter Examples … without much talking …
Searching for users which have a bad password count of 0. Here’s an example of Petra’s account:

Get-ADUser -Filter {badpwdcount -eq '0'} | Select-Object Name

Searching for users which have a bad password count of 0 and are enabled. (You’ll see Petra is not enabled).
Get-ADUser -Filter {(badpwdcount -eq '0') -and (enabled -eq 'true')} | Select-Object Name

Display all Windows Server Domain Computers, but only those that are running Windows Server 2016 and whose names starts with DC.
Get-ADComputer -Filter {(operatingsystem -like '*2016*') -and (name -like 'dc*')}

But sometimes you we have to find another way. Namely when no filtering is available. Then we use Where-Object.
Filtering with Where-Object
Where-Object is always on the right side of the pipe. Filtering on the left. What that means, the pros and cons at the end of the post. For this part, we will concentrate on Where-Object.
Here are some examples from the PowerShell help.
Get-Process | Where-Object {$_.handles -gt 200 -and $_.name -eq "svchost"}
Get-ChildItem c:\scripts | Where-Object {$_.length -gt 100000}
However, I would like to use an example from one of my contributions.
Get-Hotfix | Where-Object HotfixID -like KB31*
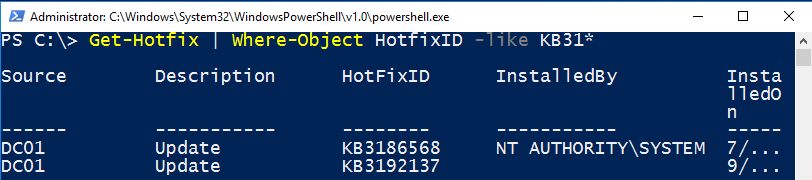
Pay attention to HotFixID. It refers to an attribute.
The recommended procedure (because of the backward compatibility) looks like this:
Get-Hotfix | Where-Object {$_.HotfixID -like 'KB31*'}

There’s something new now. What does $_ mean?
$_ is a variable which iterates over each object/element passed from the previous (pipe). Simply put: take the hotfixID from every object which comes from the pipe.
Filtering vs. Where-Object
If no filter is available, use Where-Object. If you are able to use a filter on the left side of the pipe use it! Why? Well, it’s a difference whether you send 1000 objects over the pipe or only 500, in the case of Where-Object all objects must pass through the pipe and only then are they filtered. Remember the pipe from part 7: PowerShell for Beginners (Part 7): The Pipe (and many examples to play with)
Review
Where-Object is always on the right side of the pipe. Filtering on the left. If you have the choice between a filter on the left side of the pipe or Where-Object on the right side, then choose the left side.
Exercise
Here is the exercise til next part.
Where-Object:
Use Get-Service and Where-Object to show only services that are running.
Filter (Active Directory required):
Use the Filter parameter to get all users that are disabled.
See you next time at the topic: PowerShell for Beginners (Part 11): Having fun with PowerShell Drives
Patrick Gruenauer, MVP PowerShell
Categories: PowerShell


I just found this site and I am impressed. Seeing how I am converting to PS from pure dos, how can I filter out a variable? Using Dell for example I want to read the model on the machine. When I use WMIC ComputerSystem GET Model the return value on any laptop is Latitude 5590 in this example, I would just like the model number only. How can I filter for that?
LikeLike
I am new to PS. I have read some other powershell books but going through these steps, it just so different. Great article with examples. Thank you so much taking time to write these steps…
LikeLiked by 1 person
Just found your site and WOW….Lots and Lots of killer tips. I was having some filter questions and your post helped out a ton. I really like your posts and how they are laid out. Great content.
Thank you for your hard work.
Rob.
LikeLike
Hi!
Welcome to my site. Happy you like it.
All the best,
P
LikeLike
Just found your site and WOW….Lots of valuable content. Just wanted to say thanks for taking the time for all the write-ups.
LikeLike