
After the fifth part PowerShell for Beginners (Part 5): The Execution Policy (ps1 Files), we dedicate ourselves to the topic PowerShell Profiles and PowerShell ISE. But before we will take a look at this parts the answer of the fifth exercise. We will also have a quick review what we’ve learned so far in Part 5.
All parts of the series can be found here: PowerShell for Beginners (Series)
Review (Part 5)
Exercise
In the last part I asked:
Change the execution policy that all scripts from the Internet must be signed. Try running a script you created yourself. What happens then?
Ok, this exercise is an easy one. To change the Executionpolicy to RemoteSigned we have to use Set-ExecutionPolicy.
Set-ExecutionPolicy -RemoteSigned
Now take the script from part 5 and run it. And you see that it works. Why?
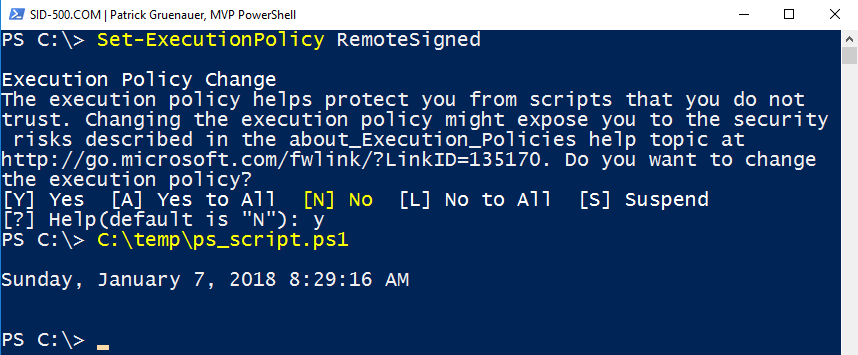
If the Execution Policy is set to RemoteSigned, you can run only foreign scripts from Trusted Publisher, but you can also run your own scripts (that are not signed).
The most important Execution Policy values are restricted, unrestricted, remotesigned and allsigned. There are differences between the Client and the Server Editions. When dealing with scripts be aware of the PowerShell Execution Policy. The Execution Policy could prevent you from running PowerShell scripts.
PowerShell Profiles
When Windows PowerShell starts, standard modules (the commands for this modules) are loaded and the the prompt is set to C:\Users\Username. If you want to get powershell to do something at startup (for example display the date, change the windows title), then it’s a good idea to create a Powershell Profile.
The profile is loaded with a PS1 file, which is located (once it is created) in the users documents folder and is loaded at PowerShell startup. We’ve dealt with PS1 files in Part 5.
Checking Prerequisites
It’s necessary to verify that the Execution Policy allows self generated ps1 files to run. The Execution Policy should be set to either RemoteSigned or Unrestricted (not recommended).
Get-ExecutionPolicy
![]()
If it’s set to Restricted, then the Execution Policy must be adjusted.
Set-ExecutionPolicy RemoteSigned
What have we learned so far?
If you want to get powershell to do something at startup, create a PowerShell profile file. Be aware of the Execution Policy.
Configuring a Profile for the Current User
Now the profile file can be created with New-Item. $Profile is a variable and refers to your PowerShell Profile location. It’s a default value. Type
New-Item -ItemType File -Path $Profile -Force
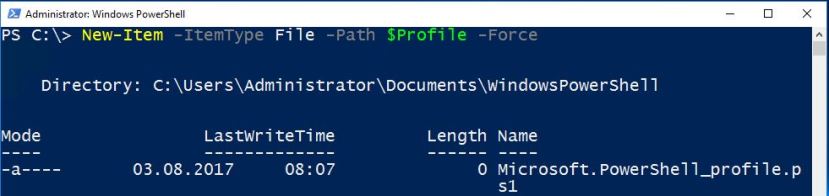
The file is then stored in the user profile C:\User\Name\Documents\WindowsPowerShell.

Configure a Profile for all Users (Side Note)
We are able to configure a Profile for all user as well. To do this we add a few more values to the $profile variable.
New-Item -ItemType File -Path $PROFILE.AllUsersAllHosts -Force
This will configure a profile file for all users and all hosts (PowerShell and Powershell ISE). Which brings me to the next part: PowerShell ISE
Review
There are several profile types. The location of the profile is stored in the $profile variable.
PowerShell ISE
In this section we are going to edit our PowerShell Profile. The best way to do this is in PowerShell ISE. What is PowerShell ISE?
Here’s is the official Microsoft Docs statement:
The Windows PowerShell Integrated Scripting Environment (ISE) is a host application for Windows PowerShell. In Windows PowerShell ISE, you can run commands and write, test, and debug scripts in a single Windows-based graphic user interface with multiline editing, tab completion, syntax coloring, selective execution, context-sensitive help, and support for right-to-left languages. You can use menu items and keyboard shortcuts to perform many of the same tasks that you would perform in the Windows PowerShell console.
Simply put, PowerShell ISE is a script editor. That sounds good.
Let’s do the first steps. PowerShell ISE is installed by default. You can open it using the Windows Search or running the command ise.


And here it is. Welcome to PowerShell ISE.

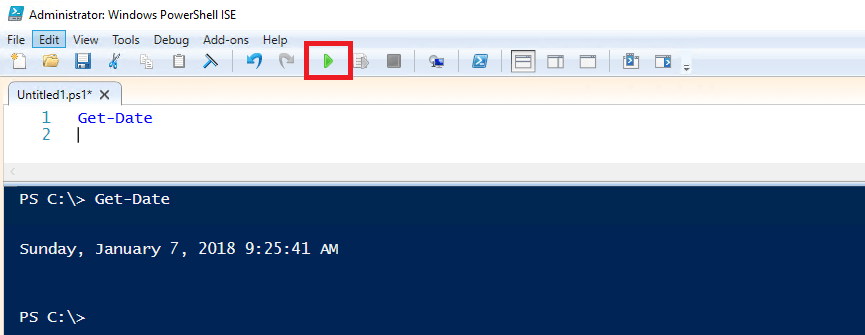
Now let’s type a command in the first line. For example Get-Date. Then press Enter. Nothing happens. That’s not really true, because the cursor is now located in the second line. To run Get-Date you have to press the green Start button in the top menu.
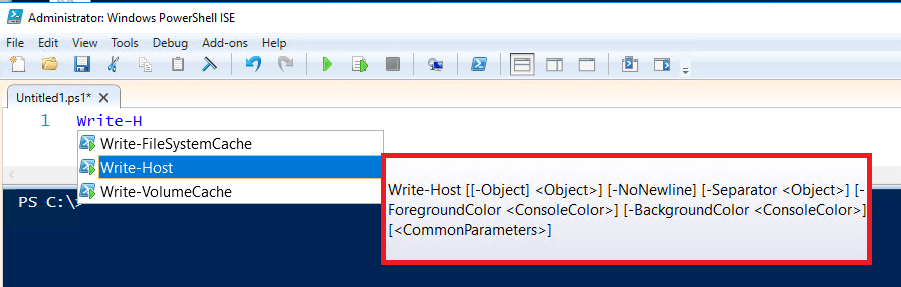
Delete Get-Date. This should show you that it is easily possible to copy or delete commands without executing them. We proceed with another command that is more suitable for this session: Write-Host.
Microsoft states that there is a Tab completion and a color highlighting. Type Write-H and then wait second. The ISE provided you with some suggestions. That’s a nice feature.
Next press TAB. Type ‘This is my first PowerShell ISE session’. Then press – and select ForegroundColor.
Next press Space. Wow we are offered the colors. Select your favorite.
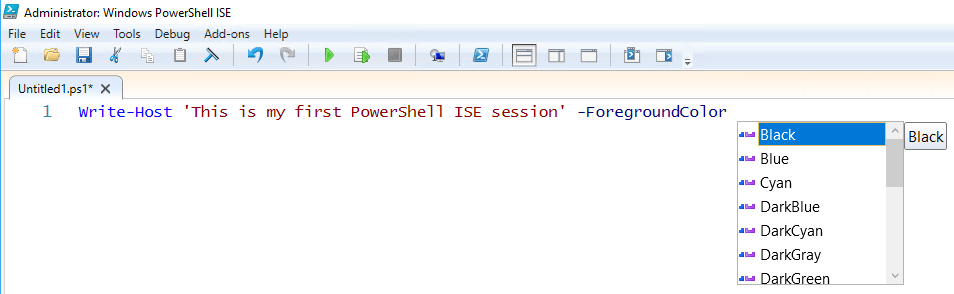
Write-Host 'This is my first PowerShell ISE session' -ForegroundColor Yellow
Our script is complete. Press the green start button.

Ok, this was quick overview of PowerShell ISE which you can build on. Now we come to the final and most interesting part: Adjust the PowerShell Profile.
Review
The PowerShell ISE is a powerful script editor that can help you writing your scripts. It offers a graphic user interface, TAB completion, color highlighting and much more.
Adjusting the PowerShell Profile (Current User)
We have already played a bit with PowerShell ISE. Let’s open it again but now we tell ISE that it should open the previously generated profile file. For this it’s assumed that you have set the ExecutionPolicy to remotesigned and that you’ve already created your profile. (Current User)
Open Windows PowerShell. Type
ise $profile

Now you can customize your script. I have prepared an example. Copy the code into your ISE session.
Write-Host 'Welcome to' "$env:computername" -ForegroundColor Green
Write-Host "You are logged in as" "$env:username"
Write-Host "Today:" (Get-Date)
Set-Location c:\
Write-Host "PowerShell"($PSVersionTable.PSVersion.Major)"awaiting your commands."

Next test the script. Press the green start button.

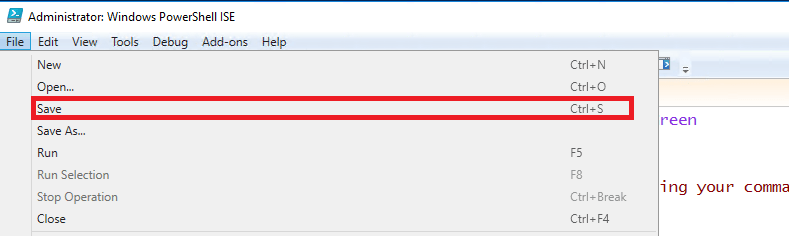
If all went well click File and Save.
Close PowerShell ISE. Open PowerShell.
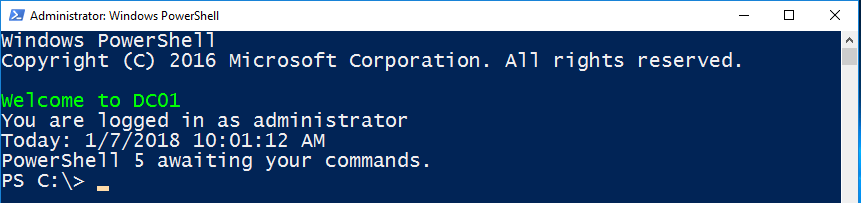
Your profile script should work as expected.
Congratulation, you created your first PowerShell script that is loaded every time you start PowerShell.
What have we learned so far?
The PowerShell Profile can be opened with the command ise $profile. Any adjustments to the profile will be loaded at PowerShell startup.
Which takes me to the next part. It’s about doing it yourself.
Exercise
Here’s the exercise up to the next part.
Open PowerShell ISE. Create a PowerShell Profile for all Users. Insert the command Start-Transcript in the first line. Save the file. Open PowerShell. What happend for all users?
The solution can be found in the next part.
See you at the next article: PowerShell for Beginners (Part 7): The Pipe (and many examples to play with)
Patrick Gruenauer, MVP PowerShell
Categories: PowerShell


Thank you, Patrick. Greatly anticipating the next lesson.
LikeLike
Thank you. I’m glad you like it. Keep it up!
LikeLike
Hi Patrick, thanks for doing these tutorials. I’m following along intently and enjoying what I’m learning. Just have a small note, the exercise from the end of lesson 5 doesn’t quite match what you have at the start of lesson 6. Lesson 5 asks to set Execution Policy to only allow signed scripts (AllSigned), but lesson 6 says to set to RemoteSigned.
Again, thanks very much for doing these, looking forward to the next ones.
LikeLike
Thank you for the input. Going to fix this.
LikeLike