
After the part PowerShell for Beginners (Part 7): The Pipe (and many examples to play with), we are now going to concentrate on objects. The basics you can build on. But before we will take a look at this parts the answer of the last exercise. We will also have a quick review what we’ve learned so far in Part 7.
All parts of the series can be found here: PowerShell for Beginners (Series)
Review (Part 7)
Run Get-Hotfix. Show only the number (KB) of the hotfix and the install date in list format.
This was the exercise of part 7. Ok, we have to run Get-Hotfix. And then we have to format the output in a list format and show only two things. The name and the install date. For this we need the pipeline.
Let’s do it step-by-step.

When you run Get-Hotfix without any parameter then you are able to see the header names (let’s call them object attributes, more about this further down). So now we have the names. It’s easy to put this in a more complex command with a pipe.

Here we are.
Review
The pipe takes everything on the left of the pipe and forwards it to the command to the right of the pipe. Format-Table, Format-List and Format-Wide adjusts the output of a command.
Feel the power of the object-based PowerShell
PowerShell is object orientated. What does this mean and what does this bring? Well, in object orientated environments someone has already done something for you. Such a nice person. Who was that? I don’t know. Surely a developer of Micrsosoft, or rather several. 😉
I can’t say it better than Bruce Payette, the author of Windows PowerShell in Action (Second Edition):

You use objects somebody else has defined for you.
What’s the point? Let me give you an example. You certainly know ipconfig, it’s a command to show your IP settings. Ipconfig outputs plain text.

So far so good. What if you want to display only the IPv4 Address? Yeah I hear you shouting out loud: “This is possible, use find”. Ok, let’s do it.

Now let’s say we want only the IPv4 Address and the IPv6 Address in table format. Now it’s getting really complicated. It’s a huge effort to output or to call up single items from a text output.
Ok, the equivalent command to ipconfig is Get-NetIPAddress.

And now look at this:

The second one is much sweeter. Let me give you another example: dir in cmd and Get-ChildItem in PowerShell.
Dir (if entered in cmd) outputs plain text.

Get-ChildItem outputs objects.
Side Note: If you run dir in PowerShell, Get-ChildItem is executed. This could be a little confusing.
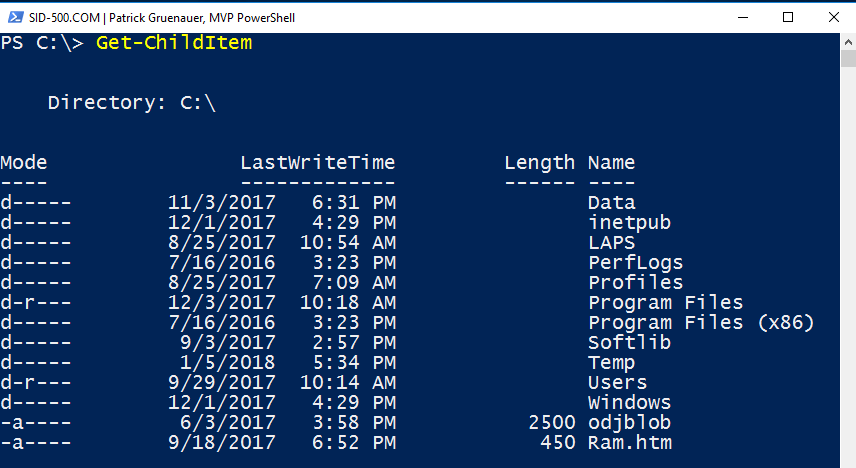
Here’s a small taster for the upcoming topic. Get-ChilIdtem and Objects in Action.
Get-ChildItem -File C:\Temp | Select-Object Name,LastWriteTime,CreationTime,Directory,Length

Now we will take a deep dive into PowerShell Objects.
Discovering the Things someone has already defined for you (Get-Member, Select-Object)
We will continue to focus on the example above. I’ve executed the command
Get-ChildItem -File C:\Temp | Select-Object Name,LastWriteTime,CreationTime,Directory,Length
Now let’s take a look to the “normal” output of Get-ChildItem. It shows you Mode, LastWriteTime, Length and Name.

How did I know there was more? (CreationTime, Directory)?

I’ve looked in advance to see what’s going on with the Get-Member command.
Get-ChildItem | Get-Member
And there I found 2 attributes:
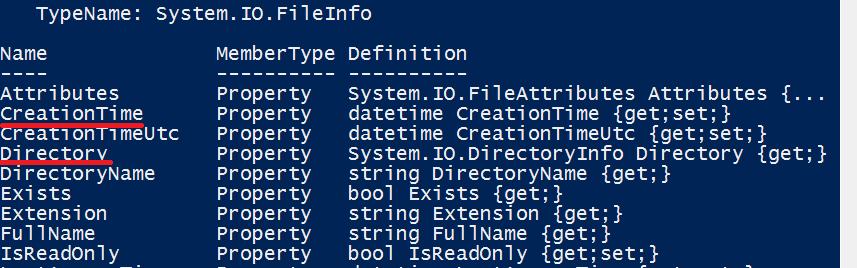
And then I simply use this attributes.
The Get-Member cmdlet gets the properties and methods of objects.
The Power of PowerShell is object-orientation. This is what distinguishes PowerShell from many other tools. You have to deal with Objects. Otherwise you will never realize the power of PowerShell.
Use Get-Member to explore objects.
What are properties and methods?
Introduction to Attributes and Methods (Get-Member)
I have mentioned that there is more. We can do more with PowerShell then simple run commands. PowerShell is object-orientated. There are attributes and methods. Let’s take a look at attributes first. Ok, let me underline the importance of what we are doing now. I claim: You have no chance to understand even the help if you are not familar with objects. You don’t believe me?
Get-Date is an easy command. But if you take a look at the examples you will see that an example is already dealing with objects … If you run Get-Help Get-Date -Online and scroll to example no 4 and 5 and you don’t understand what’s going on there then you are in troubles.
Get-Help Get-Date -Online
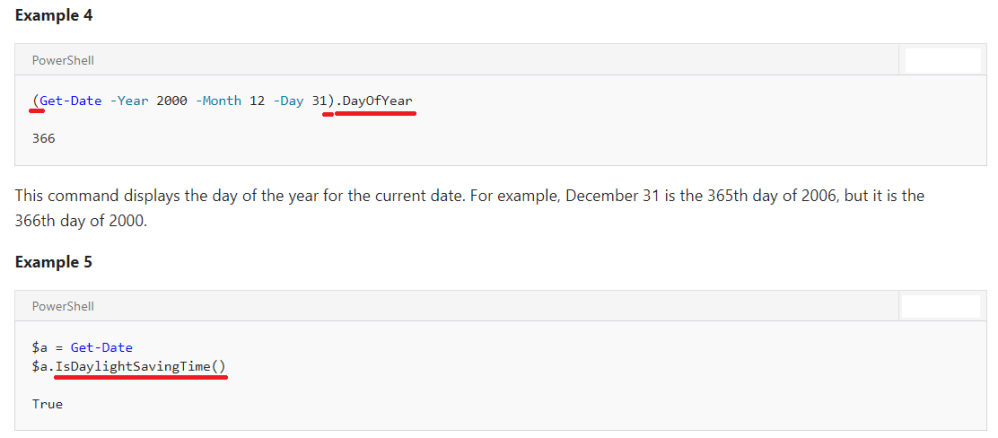
What does this all mean? What is the meaning of the dot and what are the brackets and how do I know where to look?
If you don’t even understand the help how could you become a good PowerShell guy? I hope I provoked you a little bit. 😉 Ok, let’s start.
We distinguish between attributes and methods.
Attributes – What an Object is
Attributes show you what an Object is. An object could be green, it could be a date, it could be true or false or something else.
Let’s take the example of Get-Volume.
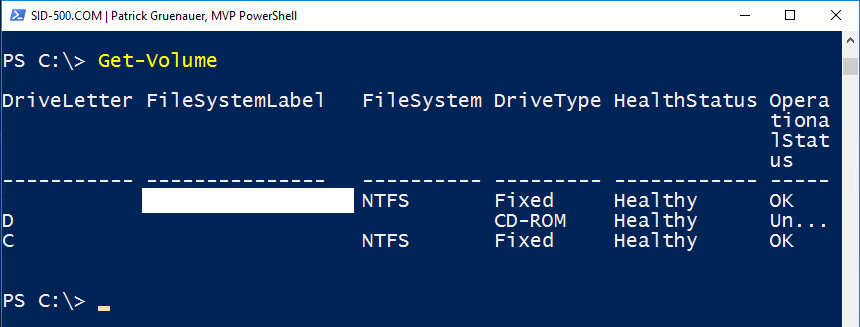
Get-Member displays all attributes of the Get-Volume command. And you have to use the pipe.
Get-Volume | Get-Member -MemberType Properties

Now we are able to call up those properties. The best way to do this is using Select-Object. Let’s say we want to show the drive letter, the size and the size remaining. By the way: Don’t forget to use TAB.
Get-Volume | Select-Object DriveLetter,Size,SizeRemaining

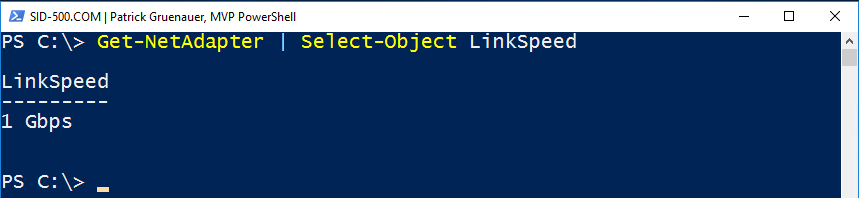
Another example. What’s the link speed of your network card?
Get-NetAdapter | Get-Member -MemberType property
You’ll find a property LinkSpeed.
Get-NetAdapter | Select-Object LinkSpeed
Okay, let’s make a stop here. What do we need this for? An example. You want to save all file names in one file. For this we need the list of all file names, and only the names. ONLY the names! How do we get all the names? Step 1 is to find out the attribute of the file name.
Get-ChildItem C:\Temp | Get-Member -MemberType property
You’ll find a property called FullName. Here we are.
Get-ChildItem -Path C:\Temp\ | Select-Object FullName

And save it to a file …
Get-ChildItem C:\Temp\ | Select-Object FullName | Out-File C:\Temp\test.txt
For this part, it’s only important that you remember that there are attributes and that they can be displayed with Get-member.
To underline the importance of this topic: Know how about objects makes the difference. The difference between normal PowerShell users and good PowerShell users.
Let’s say your boss would like to have a list of all servers of your domain. What should we do now? Taking screenshots? Purchasing a 3rd party tool? Not necessary. Use PowerShell.
Get-ADComputer -Filter {operatingsystem -like '*server*'} | Select-Object Name | Out-File C:\Temp\servers.txt

Take this list and give it to your boss.
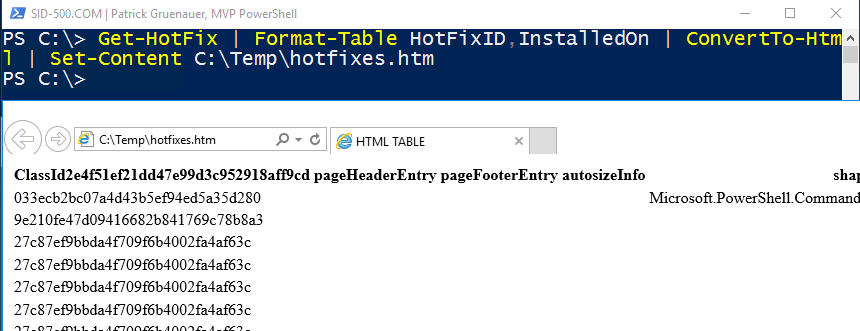
Want a list of all the installed hotfixes in HTML format? Run PowerShell.
Get-HotFix | Select-Object HotFixID,InstalledOn | ConvertTo-Html | Set-Content C:\Temp\hotfixes.htm

But wait a minute. We’ve learned in Part 7 (The Pipe) that we can do a lot of things with the format commands. Does this also work with Format-Table? The answer is Yes. But that’s not a good idea.
Remember: Use format commands (Format-Table, Format-List and Format-Wide) only at the end. Select-Object is your friend when it comes to objects. If you want to list data on the screen, use Format table. For everything else, use Select-Object. Select-Object forwards data as they are, format table modifies data that can lead to unexpected behavior.
Attributes show you what an Object is. Use Get-Member to explore attributes. Use Select-Object to retrieve attributes. Select-Object and the Format commands are not friends. Use Format-Table/List/Wide only at the end of your code. Use Select-Object to get unchanged objects.
Methods – What an Object can do
Let’s take the example from the introduction. It shows the help of Get-Date. Most of the examples refer to attributes (What an object is). But we want to change something, we want to do something. In the last part we have used Select-Object. In this part we will use a special .NET method. How do you like this instead of Select-Object?

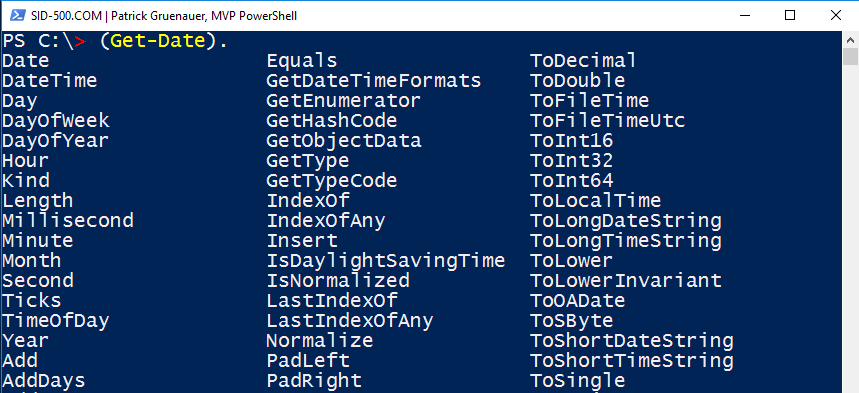
Okay, let’s slow down. You can use Select-Object or a. NET method (). If you use the. NET method, there are some advantages. Type the following in PowerShell:
(Get-Date).
Now press CTRL + Space. Wow that looks nice. You get all the objects presented. Take your pick.
What are the brackets for? Commands in brackets are executed instantly. This means that the value is already there when you use a method. Ok, there’s a method called Addays. Let’s count back seven years. Don’t forget to use TAB to avoid typing too much.
(Get-Date).AddYears(-7)

Another example is exploring all methods of the Get-Service command.
Get-Service | Get-Member -MemberType method

There’s a method called Stop. That sounds good. We can stop the service with this method.
(Get-Service spooler).Stop()

Ok, I have to admit it’s easier to stop the service using Stop-Service.
What about strings? I store my name in a variable. Variables are used to store information.
$string='Patrick Gruenauer'

The question now is what can we do with this name? Suppose we want to show the first 2 letters. If you know Get-Member then you are able to explore the methods of this string.
$string | Get-Member
There you’ll find the Substring method.
$string.Substring(0,2)

Nice. If you want to separate the given name and the surname then use the split method, It is not necessary to mention that you can find this method via Get-Member.
We have to search for a separator. Our separator ist the space between my first name and my last name.

Ok, my name is stored in $string. Now I use the split method.
$string.Split('')

Nice.
Methods can change or do something. Run Get-Member -MemberType Method to explore methods. Put the command and the method values in brackets.
What is this all for?
I can’t mention it enough. Be patient. In the next part we will discuss WMI. Then you will feel the power of objects. But before we come to the end of this part let me give you one more example: A practical example from my blog. You get a list of users. You want to create users from that text file.
This code is a bit difficult for beginners to read, but all I want to do is to underline the importance of dealing with objects. This is the list of users.

And this is the code:
Get-Content C:\temp\users.txt | ForEach-Object {$Split = $_.Split(" "); $given=$Split[0]; $sur=$Split[1]; New-ADUser -GivenName $given -Surname $sur -Name ($given + " " + $sur) -UserPrincipalName (($sur + "@" + "$env:userdnsdomain")).ToLower() -SamAccountName ($sur).ToLower() -AccountPassword (ConvertTo-SecureString -AsPlainText "Passw00rd123" -Force) -Enabled $true -ChangePasswordAtLogon $true -Verbose}

Each object in the text file (strings) will be separated. And the separator is the space. Don’t worry if you don’t fully understand this command. It’s Active Directory. The command takes each name and creates an Active Directory User with the correct given name and surname.
The full article can be found here: PowerShell: Adding Active Directory Users from Text Files (Bulk)
The 2-Step Method
Follow these guidelines and you’re able to get more out of PowerShell.
All you have to remember is a two step method. Trust me.
1. Inquiry of all possibilities: Run Get-Member
Get-Date | Get-Member

2. Call the attribute or method with (). or select-object or select
(Get-Date -Year 1976 -Month 03 -Day 23).dayofyear
(Get-Date -Year 1976 -Month 03 -Day 23).dayofweek
(Get-Date -Year 1976 -Month 03 -Day 23).AddDays(10)

Yeah, it’s my birthday. Yeah, I’m not 20 anymore. Yes, that’s almost the end of this post. ;-). I have one more example.
Another great example of how to list properties of an Active Directory user.
Get-ADUser petra -Properties * | Select-Object Name,LastLogonDate

Before I forget the exercise until the next part.
Exercise
That’s it for today. Here’s the exercise up to the next part.
Attributes
Create a directory C:\Temp1. Create a text file testfile1.txt in C:\Temp1. Use only PowerShell. If you need assistance use the help (Get-Help). Open the file. Now show the following attributes with Select-Object or another technique: The name of the file, the file extension and the date of last access.
Methods
Calculate back 10 years using Get-Date from today. Answer the following question: Which day of the year was that? (1..365?)
The solution can be found in the next part.
See you next time at the next article: PowerShell for Beginners (Part 9): The Power of WMI
Patrick Gruenauer, MVP PowerShell
Categories: PowerShell


6 replies »