
I make no secret of it: Now we come to my favorite topic: PowerShell Remoting. I love it. I hope you’ll love it too. If you are a passionate Systems Engineer or Developer you’ll find a lot of tips and tricks in this part to make work life easier and more efficient. But first a short look at the exercise from the last part.
This is part 13 of the series PowerShell for Beginners. All parts can be found here: PowerShell for Beginners (Series)
Review (Part 12)
Last time I asked to import a code and make it available to all users in all PowerShell sessions. The solution is already included in the article, so there’s no need for more explanation. It can be found at the end of the article and provides information about how to store the code to make it comfortably available for all users.

It’s much more important that you remember some basics of PowerShell Modules in the summary below.
Summary (Part 12)
A module is a set of related Windows PowerShell functionalities, grouped together as a convenient unit (usually saved in a single directory). It’s usually a set of commands and codes. Store all custom modules in C:\ProgramFiles\WindowsPowerShell\Modules. Make sure the folder and file name match.
PowerShell Remoting
First of all, take your time for this part of the series. This part is very detailed, if not the most detailed.
If you would like to be a cool guy, I mean a really cool guy, then this part is for you. I promise you that if you are familiar with PowerShell remoting then you’ll be very different from your colleagues. You’ll work differently than the others. Ok, enough talking, let’s dive in.
The many ways of Remoting
I determine: You already know now that the coolest way is PowerShell Remoting 😉
Consider that there are many ways to administer a Windows Operating System.
- Remote Desktop (mstsc)
- Remote Assistance (msra)
- winrs
- PowerShell
- other tools like sysinternals (psexec), TeamViewer, VNC …
This example starts cmd on Azdc01.
winrs -r:azdc01 -u:sid-500\patrick cmd

In this second example, a PowerShell Remote Session is established with Enter-PSSession.
Enter-PSSession -ComputerName Azdc01

In this article we will focus on the second example, what else? 😉
PowerShell Remoting Basics
PowerShell uses WinRm for remote connections. WinRm is a Windows Service.

There are some pitfalls when using PowerShell Remoting. Remember the following and everything will be fine:
Active Directory Domain
- WinRm is enabled on all Windows Server 2012/2016 by default, that means you can access your domain joined Windows Server out of the box with your domain admin credentials as shown above (Enter-PSSession)
- WinRm is disabled by default on ALL client operating systems (Windows 7/8/10), that means you cannot access this computers out of the box. You have to enable winrm with the command winrm qc or with Group Policies as described in my article: Group Policies: Enabling WinRM for Windows Client Operating Systems (Windows 10, Windows 8, Windows 7)
Workgroup
- In a workgroup environment you have to edit the Trusted Hosts list, because in an Active Directory Domain the computers trust each other, but not in a stand alone scenario
What have we learned so far?
PowerShell Remoting uses the WinRm Service. WinRm is enabled by default on Windows Server 2012/2016, but not on Windows Clients. You have to enable WinRm on all Windows Clients. Take care of the Trusted Host list, if working in a non-domain environment.
The Commands
There are many PS Session commands. I will only focus on a few of them, which I think are the most important for beginners:
Get-Command *pssession* | Select-Object Name

PowerShell Remoting (Active Directory Domain)
While PowerShell Remoting works out of the box with Windows Server 2012/2016, that is not the case with earlier versions. Remember that you have to enable WinRm, which is a prerequisite for PS Remoting, on all older operating systems.
The same goes to client operating systems.
This command shows the current status of WinRm or if not activated, Windows will start the service:
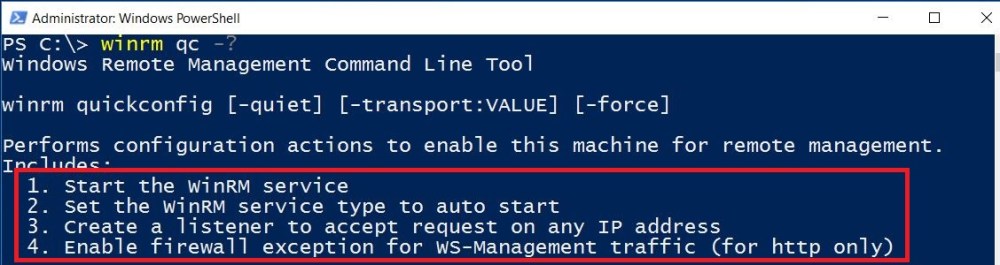
winrm qc
That looks good …

Readers know more. Here’s the explanation of the winrm qc help. We find out that there’s much more going on behind the scenes when executing winrm qc. Remember the 4 steps …
Ok, enough about this. Let’s start with some remote actions. Enter-PSSession and New-PSSession are our friends.
This example restarts the remote computer Azdc01. As you can see, after the restart command the session is broken. Why? Because the server currently restarts …
Enter-PSSession -ComputerName azdc01 -Credential patrick

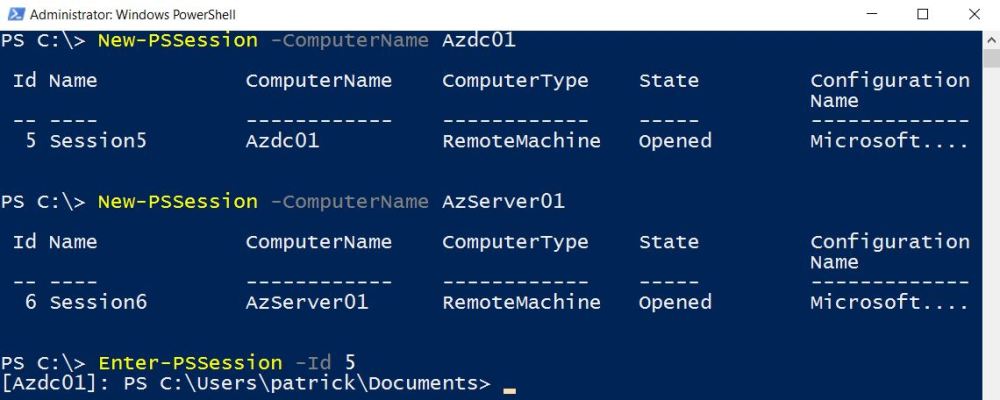
If it’s your goal to connect to multiple server at one, then New-PSSession is your friend. We can then actually jump back and forth between them.
New-PSSession -ComputerName Azdc01

New-PSSession -ComputerName AzServer01
Note that we have now two established sessions. But we did not enter either session. But we can jump to them. Look at the Session ID 5 and 6. That’s the trick.

And here we go entering session no. 5.
Enter-PSSession -Id 5
Going back … and entering session no. 6.
Exit-PSSession

Enter-PSSession -Id 6

Summary
Enter-PSSession starts an interactive session with a single remote computer. Only one session at a time. New-PSSession does the same, but the session is a persistent connection and you can establish multiple sessions to different servers. When using New-PSSession remember that you have to enter each session.
PowerShell Remoting (Stand-Alone Computers, Workgroup, non Active Directory environment)
While PS Remoting in an Active Directory Domain works like a charm, it takes more preparation to establish a remote connection because of the fact that non-domain computers do not trust each other by default.
What I’m talking about is the “List of Trusted Hosts”. The list of Trusted Hosts can be modified in GPOs or with PowerShell. This post is about PowerShell so let’s take a look at this list. The settings are in a PowerShell Drive! Hopefully you remember that we’ve already dealt with Drives in Part 11: PowerShell for Beginners (Part 11): Having fun with PowerShell Drives
It’s in the Web Service for Management (WSman) drive:

The list of Trusted Hosts can be shown in different ways …
cd wsman:
cd localhost
cd Client
Get-ChildItem

faster with …
dir WSMan:\localhost\Client\

My screen shows an asterix *. This means, that my computer trusts any computer.
If that’s the way you want it run
Set-Item -Path WSMan:\localhost\Client\TrustedHosts -Value '*'
Press Y.

Or if you want to restrict remote connections to one computer (for example IP-Address: 192.168.0.1) only run
Set-Item -Path WSMan:\localhost\Client\TrustedHosts -Value '192.168.0.1'

Check your settings …

What have learned so far?
When using PowerShell Remote Session take care of the List of Trusted Hosts.
PowerShell Remoting Deep Dive
We know now that we must take care of Trusted Hosts and take care that the Client Operating Systems must be prepared before connecting to them. Let’s say everything is fine and we can move on. In this part I am going to show the power of PowerShell Remoting.
New Cmdlets will be introduced. Look how many CmdLets support the ComputerName parameter:
 I’ve shown above how to restart a computer by connecting to it with Enter-PSSession. Well, now I have to admin that there was no need for connecting via Enter-PSSession, just run Restart-Computer with the ComputerName parameter.
Restart-Computer -ComputerName client01
Can client01 ping it’s default gateway? No need for a remote connection to client01, no need for looking for the IP-Address of client01’s gateway, welcome to the world of PowerShell! 😉
Look at this powerful One-Liner:
Test-Connection -Source Client01 -Destination (Invoke-Command -ComputerName Client01 {Get-NetRoute -DestinationPrefix 0.0.0.0/0 | Select-Object -ExpandProperty Nexthop})

Conclusion: Yes, Client01 can reach it’s default gateway 😉
Wanna remove a remote computer from the domain remotely? No problem … Here we go …
Add-Computer -WorkgroupName Group -ComputerName client01 -Credential sid-500\administrator

Wanna join a computer to the domain? No problem. Make sure the Workgroup computer lists your computer as a Trusted Host and the network connection must be set to Private Network and WinRm is enabled.
Boom … Once completed the client is restarting … and joined to the domain. Awesome? Indeed …
Add-Computer -ComputerName Client01 -DomainName sid-500.com -LocalCredential client01\admin -Credential sid-500\administrator -Restart

Impressed? Me too. But we don’t stop yet. Do you want to restart, join to the Domain or simply get other information from hundreds or thousands of computers? Then first get a list of them. For example a list of all servers.
(Get-ADComputer -Filter "operatingsystem -like '*server*'").Name

Or a list of all clients …
(Get-ADComputer -Filter "operatingsystem -notlike '*server*'").Name
Then call the shots … for example get their gateway from them.
Invoke-Command -ComputerName ((Get-ADComputer -Filter "operatingsystem -notlike '*server*'").Name) {Get-NetRoute -DestinationPrefix 0.0.0.0/0 | Select-Object -ExpandProperty Nexthop}

Or restart them all …
Restart-Computer -ComputerName ((Get-ADComputer -Filter "operatingsystem -notlike '*server*'").Name) -Force
Another cool thing is that you can do a remote ping … That said, you are able to initiate a ping with a source and destination parameter. Note that I’m logged on Server01. I want to know if client01 can ping dc01. No problem with PowerShell …
Test-Connection -Source client01 -Destination dc01

We go even further … Can client01 reach CNN.com on port 80? For this, we have to use Invoke-Command because we need a cmdlet which supports the computername parameter.
Invoke-Command -ComputerName client01 {Test-NetConnection -Port 80 -ComputerName cnn.com}

Has client01 turned on its firewall?
Invoke-Command -ComputerName client01 {Get-NetFirewallProfile -All | Select-Object Name,Enabled}

How long has DC01 been on? (Remember Part 9 PowerShell for Beginners (Part 9): Get it all from Windows with PowerShell and WMI)
Get-CimInstance -ComputerName dc01 win32_operatingsystem | Select-Object lastbootuptime

I think I have given enough examples. Which brings me to the last part. We will install PowerShell Web Access, another option for remoting actions …
What have we learned so far?
We can use either Invoke-Command, Enter-PSSession, New-PSSession or if available a ComputerName parameter to perform remote actions.
PowerShell Web Access
Have you ever dreamed of using PowerShell everywhere, from every Device and every time? For some time now PowerShell Core is out. It runs on Linux and MAC. But there’s also a feature called PowerShell Web Access. PowerShell Web Access is available on Windows Server 2012/2016 only. It enables you to access your Windows Server with a web-based PowerShell interface. That means, you can access PowerShell from every device. Let’s go.
Run the following commands on a Windows Server 2012 or 2016 to install PowerShell Web Access, create a self-signed certificate and add a authorization rule to grant access to all computers.
Install-Windowsfeature WindowsPowerShellWebaccess -IncludeManagementTools

Install-PswaWebApplication -UseTestCertificate

Add-PswaAuthorizationRule -UserName * -ComputerName * -ConfigurationName *
Now open https://localhost/pswa. Enter admin credentials and type the name of the computer in the computer name field. You may asked why we need to provide a computern name. Because the server can act as a PowerShell Web Access Gateway for other host, which means that you can jump to other servers. Highly flexible 😉

Have fun!

Summary
PowerShell Web Access enables you to access your Windows Server in a web-based Interface from every device.
Exercise
No exercise for this part. Why? There are a lot of examples in this blog post. Try to run all of them in your domain or non-domain environment.
See you next time at the part: PowerShell for Beginners (Part 14): Top 10 PowerShell Commands for Beginners
Categories: PowerShell


Hi Patrick Gruenauer,
Thanks a lot it is really helpful document, I would like to ask one question if your or others who read it have a time to answer.
Does anyone try to communicate through SSH with Cisco switches using Powershell,if you yes please share your details?
Thanks & Best Regards
LikeLike
Thanks Patrick for sharing this article
LikeLiked by 1 person
Excellent bit of info on PS remoting. When I took local CC classes I had asked the instructor about this very topic, and did not get nearly as clear an answer that worked reliably. That may partly be because the material we were given to study from was for previous versions, and this is the first usable info I’ve found so far.
I did however run into an issue with using the winrm qc command on one of the remote computer. It showed that WinRM was already running but that the Firewall exception would not work as one of the network connections was set to Public. I’m not sure how to address that error. Would you mind helping me learn how to address this?
PS C:\WINDOWS\system32> winrm qc
WinRM service is already running on this machine.
winrm : WSManFault
At line:1 char:1
+ winrm qc
+ ~~~~~~~~
+ CategoryInfo : NotSpecified: (WSManFault:String) [], RemoteException
+ FullyQualifiedErrorId : NativeCommandError
Message
ProviderFault
WSManFault
Message = WinRM firewall exception will not work since one of the network connection types on
this machine is set to Public. Change the network connection type to either Domain or Private and try again.
Error number: -2144108183 0x80338169
WinRM firewall exception will not work since one of the network connection types on this machine is set to
Public. Change the network connection type to either Domain or Private and try again.
LikeLike
Thanks for your kind words. You must set the network to either private or domain.
LikeLike
You are welcome! Sorry, I forgot to mention that I have only one active network connection for that computer, and it is private. I’ve also checked the Firewall settings, and the only active network it shows is that private one.
LikeLike
I would recommend checking the Troubleshooting WinRM article on Technet
LikeLike
You can change it in the GUI or search my site I have published an article about this. Just search for Firewall.
LikeLike
bookmarked!
LikeLike