
Firewalls control traffic. They use technology such as Stateful Inspection to establish a connection to other networks. In this article I describe how to configure the host-based Windows Firewall by using Windows PowerShell.
Since Windows XP SP2, the built-in host-based firewall is enabled by default in every Windows operating system. That means that every Windows Systems Administrator and Developer has to be familiar with it. However, I have learned that this is often not the case in practice. Maybe it’s because of the graphical interface or the lack of interest. Who knows. In many environments the firewall is even deactivated. In this article I’m going to show how to configure Windows Firewall with PowerShell. The basics you can build on.

The Graphical User Interface
First of all, I have to admit that I’m not a huge fan of the Windows Firewall graphical interface. Type wf.msc oder search the system settings to open Windows Firewall. Who came up with these firewall rule names? It’s really frustrating, but there’s no way out.

The Module NetSecurity
In Windows PowerShell all firewall commands can be found in the NetSecurity module.
Get-Command -Module NetSecurity | Format-List Name

Enable and Disable Windows Firewall
This brings me to our first PowerShell Cmdlet: Set-NetFirewallProfile. It enables you to enable and disable your host-based Firewall.
Set-NetFirewallProfile -All -Enabled false

Set-NetFirewallProfile -All -Enabled true
For the cmd fans among us, yes netsh is still alive.
netsh advfirewall set allprofiles state off

Creating new Firewall Rules
Well, if you are not happy with the pre-configured rules, add your own rules. Use the New-NetFirewallRule cmdlet. Here’s an example how to block all incoming http traffic.
New-NetFirewallRule -Name "Block HTTP" -DisplayName "Block HTTP" -Enabled 1 -Direction Inbound -Action Block -LocalPort 80 -Protocol TCP

This brings us to the next command: Get-NetFirewallRule. Let’s search our previously configured rule.
Get-NetFirewallRule -Name *Block* | Select Name,Enabled,Direction,Action,PrimaryStatus

More about New-NetFirewallRule here: https://docs.microsoft.com/en-us/powershell/module/netsecurity/new-netfirewallrule?view=win10-ps
More about Get-NetFirewallRule here: https://docs.microsoft.com/en-us/powershell/module/netsecurity/get-netfirewallrule?view=win10-ps
Defining a Scope
Let’s say we want to restrict HTTP access to one computer only. Don’t ask me why, but this is our scenario for this part. 😉 So, client01 should be the only computer which can reach dc01 via HTTP.
Let’s now change the scope. What I mean is this:

To make this work I have to change my rule to allow. Then I restrict HTTP access to client01 only.
Set-NetFirewallRule -DisplayName "Block HTTP" -Action Allow
Now I’m going to disable the default HTTP in rule which comes with the Windows Server Role Web-Server. If I don’t do that, my subsequent test won’t work.

Set-NetFirewallRule -DisplayName "World Wide Web Services (HTTP Traffic-In)" -Enabled false
That now means that my rule is the only HTTP rule on my computer. Now we change the scope.
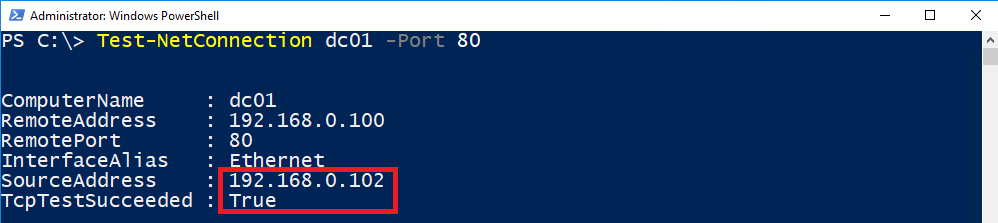
Set-NetFirewallRule -Name "Block HTTP" -RemoteAddress 192.168.0.102

Let’s do a quick check. On 192.168.0.102 I get a True. On 192.168.0.19 I get a False. That works!

Windows Firewall Remote-Administration
If your computers share the same Active Directory Domain, you can simply configure Windows Firewall Settings remotely. Make sure, remote management is enabled on client systems. To enable it enter winrm qc or configure WinRM by Group Policy. On Windows Server Systems no further action is required. More about enabling WinRM with Group Policies see: Group Policies: Enabling WinRM for Windows Client Operating Systems (Windows 10, Windows 8, Windows 7)
Let’s move on. I’m logged on DC01 and want to check if client01 has it’s Firewall enabled. In order to do this, enter
Invoke-Command -ComputerName client01 {Get-NetFirewallProfile -All | Select Name,Enabled}

That looks good. It’s enabled in all profiles.
And here you can find a command to test all firewall of all server systems:
Test-FirewallAllServer: Query the Firewall status on all Windows Servers
Conclusion
I hope I could give a good overview. More information about Windows Firewall here:
https://technet.microsoft.com/en-us/library/hh831755(v=ws.11).aspx
Categories: Cyber Security, PowerShell, Windows 10, Windows Server


Hi – I tested this and it removes what is already there and replaces it. I would like to just add other IP’s to the scope?
LikeLike
Has anyone tried performing these remote firewall configurations using a list of hosts? I find this simplifies bulk server security configuration: https://ciphers.pw/threads/powershell-set-firewall-rule-across-domain.8219/post-72983
LikeLike